|
HOBBY |

![]()
Written and photographed by Kate Nivison
![]()
'Do you
want to see my holiday snaps?' Now be honest! Some people don't mind
shuffling through wads of prints - all landscape (or horizontal
shots as we used to call them before computers), and mostly of 'me
and the family/my mates' slightly out of focus, beaming at the
camera from somewhere that could be anywhere. Isn't the palm tree or
road sign growing out of your best friend's head becoming rather too
familiar? 'See that black dot? That's a rhino', may still raise a
smile. But wouldn't the friend have looked much better for a
moment's thought and a bit of repositioning? Rhinos, on the other
hand, can definitely be tricky.
 |
 ou
don't have to have the latest digital camera to become a hotshot,
although these are getting cheaper and better all the time; an
automatic with manual override or even a disposable type picked up
in 'duty-free' will do fine. It's what you do with it that counts,
and a few tricks can make all the difference between a yawn and a
'wow!', or whether you decide a shot is worth printing or emailing
around - or deleting it from your life for ever. By the way, if you've watched a barrage of press cameras flashing away on TV or
witnessed a 'photo shoot', you will have noticed that many pros
still prefer their (fabulously expensive) traditional Hasselblads,
Leicas and Rolleis, maintaining that digitals are not quite there
yet for the highest quality results. But whether you're a pro, or an
aspirant, there are a few tricks that anyone can try, which can
reduce the amount of deleting or chucking out you have to do, not to
mention the cropping and editing that often has to be done. It may
feel like fun at first, but it can be very time consuming.
ou
don't have to have the latest digital camera to become a hotshot,
although these are getting cheaper and better all the time; an
automatic with manual override or even a disposable type picked up
in 'duty-free' will do fine. It's what you do with it that counts,
and a few tricks can make all the difference between a yawn and a
'wow!', or whether you decide a shot is worth printing or emailing
around - or deleting it from your life for ever. By the way, if you've watched a barrage of press cameras flashing away on TV or
witnessed a 'photo shoot', you will have noticed that many pros
still prefer their (fabulously expensive) traditional Hasselblads,
Leicas and Rolleis, maintaining that digitals are not quite there
yet for the highest quality results. But whether you're a pro, or an
aspirant, there are a few tricks that anyone can try, which can
reduce the amount of deleting or chucking out you have to do, not to
mention the cropping and editing that often has to be done. It may
feel like fun at first, but it can be very time consuming.
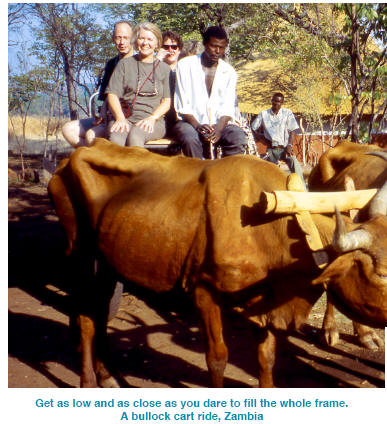
Filling the whole frame
The idea
here is to eliminate as much 'dead ground' as possible (usually
tarmac, sky, sea or blank walls) by constantly checking the
viewfinder, or LCD
(liquid crystal display) screen on digitals, and your zoom. You want
the whole attention to be focused on that special something - maybe
one person, a group or any outstanding feature - and that means
getting as close as you can without stopping the traffic or falling
off a cliff. Crouching down can be particularly effective for
getting rid of too much foreground. Of course, the latest digitals
will actually help you to frame a shot to eliminate the boring bits,
and there is always the comfort of knowing that you can crop the
shot afterwards. However, if it's good definition and high
resolution you are after, it's definitely preferable to compose the
shot properly in the first place.
 |
Avoiding camera-shake
With a
non-digital camera it's best to use a fast film (at least 200 speed)
for anything except interiors or dull, cloudy places, because this
allows less time for a tremor to be registered, even if you are
shaking like a leaf, or the boat/plane/road vehicle is bouncing all
over the place. The LCD on mid-price-range digitals now shows a
warning about camera-shake and it will actually refuse to take the
picture. The more zoom you use, the more exaggerated any tendency to
shake will be. Your LCD may also politely suggest the use of a
mini-tripod. This is a simple, bendy wire device, hardly bigger than
a tepee of pipe cleaners, and gets good results for close-ups of
subjects such as flowers, insects or jewellery. Mini-tripods fit
easily into a pocket and often come free with your initial purchase.
The old tricks are the best - to reduce 'shake' generally, brace
yourself squarely, tuck your elbows into your sides, take a deep
breath and hold it as you press the button.
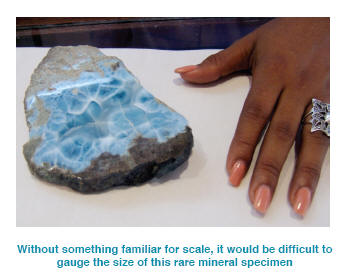 |
Attention to detail and adding scale
Imagine
coming across a tea-tray-size jellyfish washed up on a wonderful
beach. You click away, but back home it looks like a tiny,
water-filled polybag, and is, in any case, near transparent against
the sand. Moving it is not an option. Now geologists traditionally
use a rock hammer, but that's impractical for the rest of us, and
carrying a ruler can be a bit boring too, so get used to being
imaginative when it comes to giving a sense of an object's true
size. Try including a 'prop' - a sunhat, skis, a plate of scrummy
local food or fruit, even a sandal, shoe or drinks can - the
brighter the better. To brighten up and help locate an otherwise
ordinary shot of an interesting object or view, try to include
something red or yellow, especially if there is a lot of blue, green
or brownish scenery around. I know one real pro who always carries a
couple of child-sized, bright red T-shirts in her bag, and persuades
a likely kiddie to wear one and pose for scale - after which, of
course, they get to keep the T-shirt. On the other hand don't let
your travelling companion(s) always smile at the camera; train them
to stand to one side and look at something interesting, again for
scale, or even to point, to highlight the focus of the shot.
 |
Composition and structure
When it
comes to composition, it's worth thinking each time about what kind
of shot you really want. Put simply, this means that most shots
involve a choice of this sort: do you want (a) friend/relative at
Piccadilly Circus, (b) Piccadilly Circus itself, or (c)
friend/relative smiling at you, never mind where? You can then
compose the shot with your priority in mind.
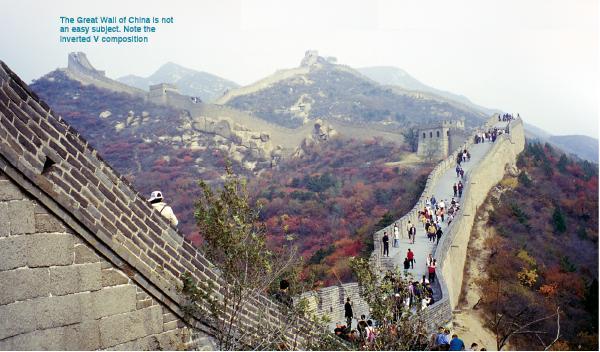
It also
works wonders to try thinking like an artist, which means looking
for structure. Centring a V shape or a pyramid shape formed by
mountains or buildings is very effective, and so is including a 'vanishing point' perspective made by lines, of perhaps a road or
railway, converging into the distance.
Some
professional photographers (and artists) believe very firmly in the
'Rule of Thirds' - that's where you don't place the object of your
interest dead centre, but set it in one third of your picture (think
of your frame divided vertically into three, or into three
triangles, making a large W). It's always worth considering, but
this can sometimes detract from the point of a shot, and can become
just as much of a photographic cliché as too many dead-centred
shots. Another good tactic for adding structure is to watch for
suitable 'framing' (or even partial framing) material in the
foreground, such as fronds of bamboo or palms, arches or flowering
bushes. Train yourself to look out for strong lines that make a
pleasing pattern, but don't dominate the subject.
 |
Getting to know you!
For
snapping local people as the main point of the shot, however
sophisticated the venue, it's always worth raising the camera with a
questioning smile. In some places, maybe their image is all they
have to sell, so keep some loose change handy. Some, of course, are
'professionals' themselves, and will hang out looking suitably
picturesque in any much-photographed place, but it's never worth
being mean or too dismissive. To avoid being pestered, chose a
fairly crowded or touristy area where a camera would be expected.
Then tinker around with it while trying 'practice' shots at some
other obvious point of interest while waiting for the real object of
your interest to pass by before actually pressing the shutter. Pros
refer to this waiting time as 'constructive fiddling', and it's
better than giving offence - or getting arrested. Photographing is a
severe no-no in most parts of Africa, where photographing people and
sensitive public buildings without asking first can lead to very
awkward scenes, however innocent the intention.
Tackling scenery and big buildings
The
larger and more famous the subject - Mount Fuji, Victoria Falls, the
Empire State Building and the like - the more feeble your own
efforts can appear. Postcards are usually better. For really well
known sights and obvious views (huge palaces, pyramids, large
religious buildings and so on) look for something striking or colourful in the foreground. Resting camels and horse-drawn
carriages are always good poseurs; palm trees add structure and
atmosphere, and don't forget to include vendors' stalls, local dress
or guards' uniforms and interesting architectural detail such as
tile-work. Experiment with 'portrait' (vertical) shots and odd
angles for domes, spires and interesting alleys.
 |
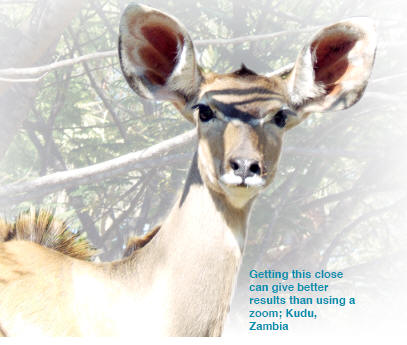
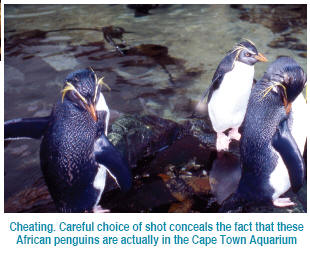
Wildlife
Without
years of experience and a very expensive and complicated camera,
wild animals, however large, are tricky. If anything, birds are
worse, and insects and fish are near impossible. At least, that's
what they used to say before digital cameras. If you are really
passionate about photographing wildlife and haven't yet succumbed to
a 'digie', you can always cheat by snapping zoo animals through the
bars, or tame ones unless they're on a chain held by a nasty man
with a stick. If you love animals, you wouldn't want to encourage
such exploitation anyway, however 'cute' the potential shot. With a
digital, you'll be tempted by even those two great impossibles,
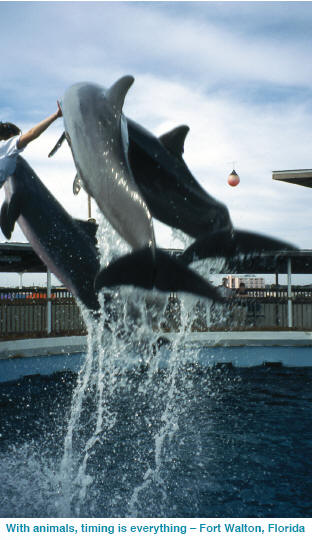
butterflies and humming birds. Even whales spouting and dolphins
leaping won't be beyond you, and tackling wildlife does wonders for
sharpening up your anticipatory reflexes. Try to work out the
natural rhythm of the animal and second-guess what it is going to do
next. That way, there will be fewer 'black-dot-in-the-distance'
rhinos, and you can also delete all those blurred wings. Above all,
remember that some wildlife photographers have been killed by
forgetting the fact that their subjects are just that - wild. A
baboon once mugged me for my ice cream. My fault entirely for being
silly enough to be eating an ice cream within half a mile of a
baboon anyway (they love them) and trying to re-load my camera at
the same time. The glint in those amber eyes and that stained-ivory
grin as he snatched his prize is with me still, but I was so shocked
that he could move so fast that I missed the shot. I'm lucky,
incidentally, to still have all my fingers intact.
Of
course, no real animal-lover would ask a guide or driver to scare
animals into providing a good action shot. If too many selfish
people try this, and they do, it makes the animals either more
difficult to find, or more prone to aggression, and that's bad news
all round.
 |
Take your time - and a spare film
and batteries
Check
who or what's coming - a donkey cart, a red car, perhaps (great),
or a large person in a big hat to block the view at the
crucial moment. Waiting for clouds to pass, a spectacular sunset or
a monkey to turn round is always worth it, but if it's something
really amazing and it's your only chance to get it, don't risk
missing it - take plenty of shots. Film is cheap, so the golden rule
is, never run out, and you can always chuck the duds. For digitals,
always make sure you have back-up batteries with you, because the
temptation to go mad and take loads of shots at high resolution can
be overwhelming when you know you can delete them. Unfortunately,
your batteries don't see it this way and will run out just as that 'important person' sails past, or the elephant you've been watching
for half an hour finally looks your way and waggles its ears.
Look and learn
Check
guidebooks, travel features and tourist material for new picture
ideas and angles. Browse through a book or two of famous paintings
to see how the old masters approached their subjects and structured
their work - it really does help. Above all, be critical of your own
work. Practice makes perfect, and you'll soon be able to look back
at your earlier efforts and see how much your work has improved.![]()